Showing posts with label craft. Show all posts

Monday, 20 December 2010

Tutorial: Felt Gingerbread Ornaments

Has the cat eaten your baubles? Got a bare spot where you've taken the crackers and candy canes away on Christmas Day? These gingerbread shapes are so quick and easy to make and can be hung from your tree or strung together to make a garland. All you need is:
  • A piece of thin card
  • A pen
  • Sharp scissors
  • Felt in a tan/fawn/biscuit colour
  • White/cream & Black embroidery thread
  • Embroidery needles
  • Soft toy filling

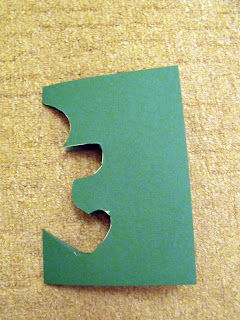
Fold the piece of card in half and draw half a gingerbread man shape. The will make sure your man is nice and symetrical. Cut him out and unfold him. (I'll happily provide a downloadable PDF of shapes should anyone want one)

Draw around your men on the felt, fit them as closely together as possible to make the most of the material. Cut out the shapes. The sensible person will now embroider one half with the design of their choosing. Give the man eyes, a nose and mouth and buttons (if you wish). I gave my man eyes and a nose and a belly button using a french knot.

Place two man shapes on top of one-another and start stitching together using a simple blanket stitch. Start at one shoulder and work all the way around to the other shoulder leaving the head un-worked.

Now for the fun.

Grab a small hunk of filling and tease it apart in your fingers to fluff it up. Start to fill your man. I found that using the end of a crochet hook helped to fill the extremities.

Sew up the head, secure the belly button on the back of your man with another french knot and slip the needle up and out of the top of your man's head.

Make a loop and secure.

Thread the loop with ribbon and hang your man in the tree.

Make other shapes too, hearts, Christmas trees, stockings and stars will all work well. Use them as little samplers for trying out different embroidery stitches. The stitch below is rosette stitch which looks like gorgeous icing dribbled all over a cookie.

So have a go, I guarantee you that making these charming ornaments is about ten times quicker than this post took to construct. Thanks Blogger!

Sunday, 13 June 2010

Top tips for unravelling jumpers...

Although i didn't post about my actual progress whilst writing this post i thought it might be useful to re-visit and share some of the tips i think might make your life easier should you choose to go jumper hunting.


Tip 1: a seam ripper is necessary! I used a fine crochet hook and it took forever to actually pull the thread out. You'll do much better ripping the thread and scissors are much too big and clumsy.

Tip 2: make sure to start at the top of the knitting. If you happen to start at the bottom of the knitting you'll be unravelling backwards and you will need to pass your unravelled yarn through the last loop of each row. Highly irritating. Unfortunately I’m not sure whether there’s a way to tell the top from the bottom. I just start at one end and if it’s not unravelling freely at the sides, it’s probably the wrong end. Go back and start from the other.

Tip 3: Make sure you wind you yarn into a ball as you go. I got all clever and thought I could “skein” the yarn as I unravelled by winding it around my hand/elbow. Yeah. Didn’t work and then I ended up with a tangled mess when I came to wind around the table. Lost a good 3 yards of yarn to a knot. Life's too short to be sat on the floor traveling to unravel a knotted skein.

Tip 4: Don’t bother with acrylic jumpers/sweaters. You can’t dye it (not at home at least) and it’s already cheap when you buy it brand new. Of course if you’re a real eco-warrior you might go for it I guess, but why bother when you could have wool instead?


Tip 5: Your yarn will come out crinkly. It just will, it's a fact of life. Don't worry about it. If you're dying it, the process should help to remove a lot of the kinks. When you're drying it, hang it round a door knob and stick a can of beans or something else weighty in the bottom. It should help to pull the kinks out enough to make it better to knit/crochet with.

You might ask, "Is it worth it?"

Yes it is, if for nothing more than the amount of yarn you can get for a pittance. It’s especially good if you’re a novice at dyeing and you don’t want to risk a rubbishy dye job on a load of brand new yarn. You’re also giving money to charity, saving a jumper from landfill and saving someone from making a fashion mistake. Consider it your good deed for the year.

Thursday, 10 June 2010

Dyeing wool with food colouring Experimentation

I dyed some more wool at the weekend using food colouring again. I wanted to have a go on some nice plain white sock wool after the attempt at dyeing the recycled sweater yarn. I got all inspired by the colours in Zauerball Crazy Tropical Fish which has lovely tones of blue-green, yellow, orange and red. The result was quite heathery in places which is not particulary what i was aiming for, i wanted graded colour but i didn't really want the dye to stick as quickly to the skeins as it did, leaving white sections.

Possibly it might be something to do with a few factors. this time there was

  • Much more vinegar than last time in the soak water
  • I don't think the saturation of the food colour in the water was as good
  • the amount of soak time the skein got was much less compared to when i dyed the jumper yarn

I'll be doing a lot more experimenting in the next couple of months with varying amounts of colouring, vinegar, soaking time to see what effect it has on the outcome of the yarn.

The method i used to dye these skeins is below.

I'm quite pleased with this skein but wish there wasn't so much heathering.

This skein is much too orange for my tastes. I like the orange but don't want the full skein this way. believe it or not this should have been orangey-red but that didn't exactly work did it. So i'll be dip dyeing a section a darker red. Maybe the dip dyeing will avoid the heathering.

How did I do it? Read on!

  1. Skein the yarn however you wish.
  2. Soak the yarn in 1 and a half litres of water mixed with half a litre of white vinegar in a bowl or bucket. Press down into the liquid until it's fully submerged. Make sure none of it is pokeing above the surface. Leave for 1 and a half hours.
  3. Prepare dye solutions as you fancy. I used about half a teaspoon of wilton colouring gel per 400ml water which was enough for the blue-green, but not for the red, hence the bright orange colour.
  4. See this post for the method of handpainting
  5. Steam for 60mins in a veg steamer
Next time i'll be having a go at dip dyeing!

Friday, 5 March 2010

Wedding Calla Table Centre Wreaths


It's taken me so long to finally get round to making the table centres for the wedding. Considering that the wedding is A WEEK TODAY and i have only completed one so far, i'm getting scared.

At least the prototype is done and i'm set to make the rest now! I'm going to try and post a tutorial of this while i'm making the rest tomorrow. I'm so pleased with them considering they're supposed to be a cheap alternative to actual flowers.


The wreaths were about £2.50 from Hobby Craft discontinued christmas stock and the flowers are made from small squares of felt with rolled felt for the stamen. Bits of ivy, the same feathers that is used in my buttonholes and onion grass just finished it off. After making 50 of the felt callas, i am totally sick of looking at my glue gun.

Wednesday, 17 February 2010

SALE in my etsy shop!

Doing a little bit of market scanning on etsy has left me realising just how competitive the felted bowls market has become. It seems like every man and his dog is crocheting bowls these days (and at prices i can't compete with), so i'm selling up and i'm going to concentrate on more arty projects. It's been a long time coming since i'm getting much more proficient at my needlecraft.

So! To celebrate this epiphany of creativity and to try and give myself a clean slate for after the wedding, i'm having a sale in my shop. 25% to 50% off all bowls. Enjoy!

www.etsy.com/show/woolboutique

Tuesday, 9 February 2010

Near Death and Valentines

This morning i nearly died on the way to work. Ok maybe that's a teeny tiny exageration, but i nearly had a head-on collision with another car on one of the windy little country roads that i drive to work every morning. There has been oodles of snow over the past 6 weeks here in the North East and this morning it began again (noooooooooo). My little micra did a massive skiddy almost into another car so some rally-driver-esque steering and managed to avoid doom.

It made me feel a bit sick and lightheaded and made me glad i'd had trusty muesli for brekkie otherwise i might have passed out from fright. Husb-to-be said i did really well and patted me reassuringly on the arm. I said thanks in a somewhat trembly manner.

Anyway, yesterday i got some parcels in the post. Some new Cascade Pastaza Yarn arrived from Pavi Yarns (registered delivery because the first lot didn't arrive and i annoyed them with emails and phonecalls until they sent me some more out). Pavi is the only place i've found in the UK that sells Cascade yarns for felting. Usually i use Cascade, Eco wool and sometimes Twilley's Freedom Spirit. These are the only felting yarns i have found, if someone knows of other felting yarns, PLEASE let me know.

The other package was THIS! (apologies for the slightly blurry desk photo)

A gorgeous Valentine's card for Husb-to-be from Storeyshop. I love it more than words can express, and it's very apt. I do love him more than etsy, but not much more ;) Check out Helen's etsy shop for a wealth of personalised cards and....SOCK MONKEYS! Yay.

Wednesday, 3 February 2010

Manic Manic

It's all very quiet and busy around my little etsy shop at the moment. Not had a sale in a while and not really updated my products much. Things are going a little stale, but it can't be helped, i'm just so mega-busy!

Wedding plans are featuring large at the moment. There's only 5 weeks to go and i still have a to-do list as long as my arm. I haven't started on making the remainder of the button holes yet, and i still have to make my table centre decorations. I'm thinking of wreaths for the table centres and i've been scouring all over the internet for lovely inspiration, which i think i now have clear in my head the kind of thing i'll be going for. It will definitely involve some crafting influence from dearest lollychops. In the form of some pretty little felted flowers.

For now though, i'll leave you with my favourite find from my inspiration wreath search.


This beautiful wreath was crafted by Kristen over at Domestifluff. The full tutorial can be found here. I can't wait to try this one at some point, although i don't think i'd have the time to make 10 of these for my own wedding.


This wreath is also fantastic and so simple to make! Originally found via weddingbee.com but the tutorial can be found by it's creator at thelongthread.

Tomorrow i'm off to the dressmakers and hopefully saturday i might get the chance to sit and actually make the last of the buttonholes, which i will share, of course! Happy hump day, it's all downhill to the weekend from here.

Wednesday, 27 January 2010

Wedding craft

As I'm sure i've mentioned over the past 2 months, (or have I?) I'm due to start out my life as a mrs in approximately 6 weeks. Marriage eh? People thought it was all a bit conventional for me, but i'm as excited as can be and i'm SO looking forward to having a lazy spa weekend for the honeymoon.

So i'm knee-deep in organisation for this wedding, and since we decided to do it on a tight budget, i've done most of the "crafty" bits myself.

So, over the next couple of weeks, as i'm getting further into the crafting, i'll be sharing some of the projects that i'm doing to try and make the wedding look super amazing. They're things that can be done on a budget, some using shop bought materials (but with suggestions for where you can use re-purposed materials).

I'll be sharing how i made my:

Buttonholes (Buttonieres)
Bouquet
Bridesmaid Purse Corsages
Table Centre Decorations
Birdcage veil & Hair pins
Ring Cushion
Invitations

...and probably more that i haven't thought of yet.

Here's a little taster of my prototype efforts at Buttonholes. They haven't ended up like this in reality, but i think they were pretty (but maybe a bit over the top) nontheless.